Saturday, October 31, 2009

Don’t be afraid….

Every year our quilt guild has a challenge where any member may participate in making a quilt to meet specific guidelines, and then enter the quilt for judging at our annual show.  One year, we did what was called a “Crayon Challenge”.   Each quilter had to reach into a brown paper bag and pull out one crayon.  Whatever color crayon you chose, you had to use that color as the predominate color in your quilt.  I decided to give it a try.  The crayon color I chose was “red orange”.

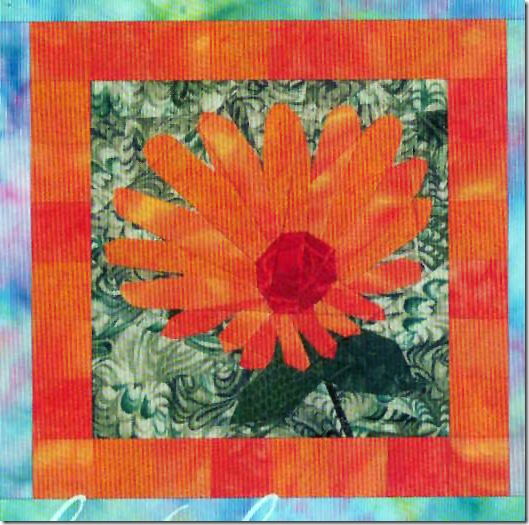
I was unsure as to what pattern to use, when I saw this photo in a quilt magazine:
a calendula 1
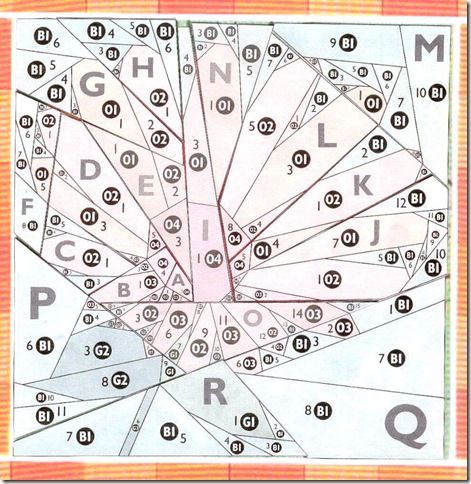
It seemed to fit the bill.  A pretty flower done in predominantly red orange.  But,  here is what the pattern looked like:
Calendula blueprint
There were over 100 pieces!  I must have been crazy.  This paper pieced pattern was well beyond anything I had ever done, but this was supposed to be a challenge, right?  I didn’t have a single red orange fabric in my stash, so of course, a trip to the fabric store was a must.  At least that part was fun.

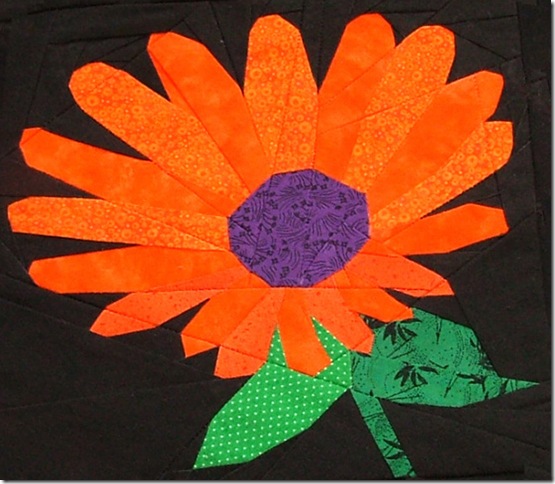
I took my time, and I eventually got the central flower satisfactorily pieced:
challenge
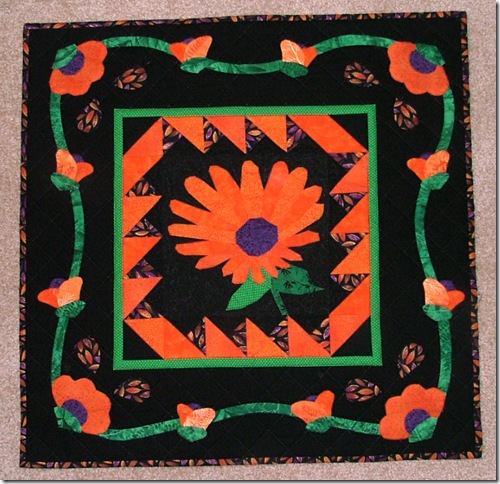
Now the question was what to do with it.  It turns out that the paper piecing was easy compared to figuring out how to set off this central flower to it’s best advantage, keeping to mostly a red orange color scheme.  I added a pieced border, and then attempted an applique border.  Here is what I eventually came up with:
Done
I think the overall design was a failure.  I didn’t like it at all. The bright orange triangular border detracts from the center.  The appliqued vines are too wide for this small piece, and I wish I had, well, I wish I had done a lot of things differently.

The height of  frustration came when I was quilting.  I had done some very small stipple quilting using monofilament thread all around the flower.  When I was almost finished, I turned the quilt over and saw this:


What a project THAT was, to rip out those tiny monofilament threads enough to release the piece of green fabric that had manage to hitchhike it’s way onto the back.

So, what does one do with an orange and black quilt?  Well, take it out every Halloween of course, so here it is.  This quilt continues to be a challenge to me.  Every year, it’s a challenge  to look at it and not think of all the things I wish I had done differently.  BUT.... entering the challenge was a great experience and it forced me to stretch my quilting self in ways I would not have done otherwise.
I actually sat down and made a list of the things I did on this quilt that I had never done before.
  • complicated paper piecing
  • working in a limited color palette
  • designing my own applique
  • use of monofilament thread for quilting
  • free motion stippling
Successful or not, these were all steps on my quilting journey that I might not have taken otherwise. So don't be afraid, and

       Happy Halloween!!

Friday, October 30, 2009

It's pumpkin time...

Here's a seasonal cross stitch scene I did quite a few years ago that suits the Fall season.


There's a pumpkin sale going on under the gazebo:


The houses with their straight sides were fun to do, but I still remember that  those trees with all the branches and scattered leaves were a bear to do. 


My favorite part was the church, complete with the pastor greeting someone out front.  I added a little stained glass window.


post signature

Wednesday, October 28, 2009

Copy that, Good Buddy!

Ever heard of a Buddy Quilt?  Neither had I, until a local class was being offered.  The concept of a buddy quilt is that two quilters work together to make different components of the same quilt.  You make twice as many of your units, and your buddy makes twice as many as hers, and then you swap your extras.  Now you each have all the units you need for a completed quilt.   My longtime friend and quilter buddy Linda asked me if I would be interested in taking the class with her. I was intrigued by the idea, so we both signed up.

Linda and I have been to many quilt shows and lectures together and we both seem to gravitate toward the same jewel tone colors.  In fact we have dubbed ourselves the "Jewel Tone Gals", so I knew that we could agree on what fabrics to use for our Buddy quilts.

We picked this bright Gingko leaf fabric for our focus fabric, along with a coordinating green and blue.


The buddy quilt pattern was basically a Card Trick block, set on point, and surrounded with a Garden Maze sashing.  The class was a lot of laughs as we each created our units and then swapped them when we were done.  No one actually got their whole top assembled by the end of the day, but Linda went home and finished working on hers.  Here is her completed quilt:


And here is mine:

Guess I've got some catching up to do.

Linda used her leftover fabrics from the Buddy quilt to make a tote that she calls her "Buddy Tote".


I could learn a lot from Linda.  Everybody should have a quilt buddy like her.

post signature

Sunday, October 25, 2009

25 cents

There was a quilter's yard sale at the quilt show I attended yesterday.  I purchased several magazines and a few patterns for 25 cents each, and 3 pieces of fabric, including a Hoffman print, for 50 cents each.  My favorite find, however, has to be this book:

It's an undated book of crocheted doilies, but judging from the cover model's Toni Tennille haircut, I'm guessing it's from the late 70's.   I know styles change, so I'll forgive the hair and the goofy harem pant jumpsuit, but there are a few photos in this book that I really have to ponder.


First, there is this 2 page spread:
Simply gorgeous doily in the foreground, but, what photo stylist thought that a rifle with ammo and the recently dead pheasant would ever, EVER be allowed to sit on top of it?


How about this one?

What would dear, departed Great Aunt Madge think, if she knew that little Suzy was not only sitting this close to her lovingly handmade tablecloth with open paints in her hand, but that she even has the container for the brushes and her other art supplies right on the table? 

Here is our cover girl again, on an inside page this time:
Didn't ANYBODY notice that there was a dog walking across the table in the background?  Model?  Photographer? Editor?  Anybody?


And then there was this head scratcher:
Nothing says "elegance" to me quite like a beautiful handmade doily, some fancy cookies served on a cut glass plate and....a pink VW Bug?  What? You don't have one?

I  already got my 25 cents worth from this crochet book, even if I never follow any of the patterns.
post signature

A finish

After a very intense quilt marathon, I finished my "Rings Around" quilt just in time to have it displayed in our guild quilt show.  It was hard to get a straight on view, but here it is:


I made this quilt top in four separate sections, quilted each one separately, and then joined them together.  It was a bit of a struggle getting those last two large sections together, and a little quilt surgery was required to get it right, but in the end, a finished quilt was born.   I guess that makes the "surgery" a C-section?


post signature

Tuesday, October 20, 2009

So here's the thing...

I've got some new photo processing software on my computer now, but it is so far forward from my old software that it's going to take some time to learn.  If I'm lucky, I will upload a picture of my latest fnished quilt and it will appear below:


It worked!  This is the quilt I just finished, called "Coral Reef".  I had the center portion finished for  last Christmas, and I gave it to my husband to let him decide if he wanted it as a wall-hanging or as a lap quilt.  He decided on lap quilt, so I expanded it in length and finally got it turned into a quilt.

Machine quilting is probably my least favorite part of quilting, but it has to be done in order to finsh a quilt, so I've had to find a way to make it work.  I quilted a diagonal line of straight stitching across all the squares and into the borders, but I skipped over the fish scenes.  Later, I went back with some variegated thread and did a wavy stitch across the fish to try and suggest some motion of the water.  Hopefully you can see the curved stitching in the photo below.

It's so nice to have this lap quilt all finished and ready to use.  Less than a year has gone by  since I gave it to my husband, so I'm not officially late yet, right?   Isn't there some kind of extended "statute of giving" for quilters?  No?  Well, we should start one.

post signature

Sunday, October 18, 2009

Bad news, Good news?


There are dust bunnies in the corners.
The laundry is piling up.
The refrigerator is bare.
I really need a haircut.
But......
My quilt is finished!!

What is it that they say?....The only place where housework comes before quilting is in the dictionary!!

(I'm currently unable to post pictures.   I am in the process of upgrading my antique computer and my equally antique photo software is not compatible with the new operating system. )

post signature

Friday, October 16, 2009

How Do You Solve a Problem Like Maria?

I'm really at a loss for something new and quilt related to blog about because I'm STILL machine quilting.  So here is a little challenge that I was tagged to do on Facebook, and I thought I'd share it here.


Pick your favorite recording artist.   Using only song names from that ONE artist, cleverly answer the following  questions: 


1. Are you a male or female? I Enjoy Being a Girl
2. Describe yourself: A Cock-Eyed Optimist
3. How do you feel: I Whistle a Happy Tune
4. Your family: My Favorite Things
5. If you could go anywhere, where would you go?: In My Own Little Corner, (or Bali Ha’i, if it they ever discover it.)
6. Your favorite form of transportation: The Surrey With the Fringe on Top
7. Your best friend: Maria
8. Your favorite color is: Impossible
9. What's the weather like: June is Bustin’ Out All Over.
10. Favorite day: Some Enchanted Evening
11. If your life was a TV show, what would it be called?: Climb Ev’ry Mountain
12. What is life to you? A Puzzlement
13. Your current relationship: I’m in Love With a Wonderful Guy
14. Looking for: All or Nuthin’
15. Wouldn't mind: A Hundred Million Miracles
16. Your fear: I Cain’t Say “No”
17. What is the best advice you have to give: Shall We Dance?
18. If you could change your name, you would change it to: Edelweiss
19. Thought for the Day: Something Wonderful
20. How I would like to die: So Long, Farewell
21. Your pet: You've Got to be Carefully Taught
22. Your motto: I am Going to Like it Here
 
Anyone else like to give it a go?  I'm going to tag Shirley and Lane because they are both doing Blogtoberfest and need to come up with something new to post everyday in October, but feel free to give it a try. If 22 questions is too many, pick just a few.  There are lots of artists out there with lots of songs to choose from.  How about Elvis?  or Madonna?  Garth Brooks? How about Andrew Lloyd Webber?  Please leave a comment in the comment section if you do, so I'll be sure to stop by your blog and read your version.  

post signature

Wednesday, October 14, 2009

Hello, my name is...

I am still in the middle of machine quilting and have nothing yet to show, so I thought I'd share a little story of something else that happened this week.

First, some background.  When I was born, my parents had not yet picked out a girl's name.  While in the hospital, my mom was reading a LOOK magazine and came across an article with a picture of a little girl that she thought was cute, and she liked her name.  She suggested the name to my dad and he liked it too, so they decided that would be my name also.  My mom cut out the article and pasted it into my baby's book. Of course it's quite yellowed by now, but you can still read it.

Last week, I came across the baby book and the clipping, and I decided to see if I could find the little girl who inspired my name.  A quick search on Facebook came up with just one person with that name.  I took a chance and sent her a message asking if she was the little girl from the magazine and it turned out that she was!
She told me that her uncle was a photographer for LOOK, and that he occasionally used her photo and that of her siblings for stories in the magazine.  Of course, she was quite surprised to hear my story, but she was glad I had contacted her.  After all these years, I was finally able to tell her that she was the inspiration for my name. 

I told her that I couldn't wait to tell my mom, and she said she couldn't wait to tell her mom too. I've often thought how it was kind of weird that there was someone out there who I was named after, and she didn't  know it.  Now she does.  It kind of feels like a mystery has been solved.

post signature

Friday, October 9, 2009

Blogger's Quilt Festival

It's time for the Blogger's Quilt Festival, hosted by Park City Girl.  Here's my contribution:
A few years ago, my talented friend Rose and I decided to do a free block of the month by Beth Ferrier called Moondance.  The pattern was a beautiful combination of piecing and applique done in colorful batiks on a dark background.  I had no applique experience, and I had no idea what I would do with such a colorful quilt, but the pattern was just too pretty to pass up.

The applique was done by hand using freezer paper applique, and thankfully, I had  Rose to guide me through it.  I simplified the flowers a little bit from the original pattern which called for much pointier petals.  Choosing which colors to use for each one was part of the fun.

By the time I was finished with the applique, I had this lively collection of threads:


And after putting it all together, here is my finished quilt top:


This post would not be complete without a photo of Rose's quilt:


Her applique was much more intricate than mine, and she included little dragonflies.  Her quilt is beautifully quilted by hand too.

I have not yet quilted my top because I'm not sure how to handle the quilting around the appliqued portions.  I'm waiting for my free motion skills to improve (or for that matter, appear at all!) or I might decide that this one is worth having professionally quilted.

post signature

Thursday, October 8, 2009

Muddling my way through.

I've been machine quilting like a madwoman.  It's time for a cup of tea and a blogging break.  Please allow me just to ramble a bit.


  • Although I only intended to stitch-in-the-ditch around all the squares in this quilt top, but after seeing the result, it seemed like the bigger squares looked too  plain, so I decided to add a quilted circle to the center of each.  I didn't have to go too far to find something to use for a template to make my circles.  I just picked what was handy.


  • I am having a love/hate relationship with the batting I'm using. I bought an 80/20 cotton blend batting which specifically states on the package that it has a "wonderful drape", and it certainly does.  It's also fairly easy to push through and around the throat space during quilting.  But, the soft drape is likely due to the fact that there is no scrim to this batting, so it is slightly fragile and also VERY linty.  So much lint that my black fabrics look grey.  Thankfully, a quick brush with the lint brush removes the problem, but seriously, look at this picture of Before and After the lint brushing.


  • Would I use this batting again?  Yes.  I do love the way it allows for the quilt to drape.  After the quilt is bound, and a good lint brushing is done, the lint will be gone and the resulting quilt will be very cuddly.  I'm glad I bought a second package to use for the Coral Reef quilt I'll be quilting next.  I just won't be wearing the black turtleneck this time when I quilt it.

  • I divided this top into four sections that I  quilted separately, and I'm in the process of working out how to attach them all together in a single quilt.  There seem to be many schools of thought on exactly how to do this.  I'm taking them all into consideration, and forging my own way.  Is it a lot of extra work?  Yes!  However, I think the big difference is that it is not a struggle.  If I had sewn all four pieces of the top together and then quilted it as a whole, I would have been struggling the whole way.

  • When working with these larger pieces, quilter's pins are invaluable.  The smaller common pins just wouldn't hack it.


  • I have a problem with tensing my shoulders when I machine quilt.  In the past, a long session of quilting would have resulted in really sore muscles the next day, but this time?  Not so much.  It turns out that throwing a ball sixty million times to a dog who wants to play non-stop Fetch is good for building up the shoulders. 


  •  Trying to make a post using bullets is a lot harder than it looks.  Please ignore any inconsistencies. It's all about content, really, right?

Now back to quilting...


post signature

Tuesday, October 6, 2009

Preparing for the winter

Everyone prepares for the winter in their own way.

Here's a little fellow who's winter preparations include building up his store of  fat.


 I've been industrious as well, doing a marathon of machine quilting.  Hopefully, I can take a lesson from the chipmunk and keep my shoulders relaxed while I quilt.  The lesson I don't want to learn from  him is how to build up a store of winter fat!  ;-)


post signature

Sunday, October 4, 2009

Song on a Sunday


Basting away again in Margaritaville.
Looking for my
Lost moments to quilt.


Some people claim
That I'm the woman to blame.
But I know,
It's all Toby's fault.


     (Aww. Don't worry Toby.  You can't help being so irresistable!)


post signature

Friday, October 2, 2009

A Tale of a Whale

I’ve made progress on the first UFO on my list.

First, a little background: This quilt began as a fabric panel of an undersea scene, called Coral Reef. I selected various parts of the fabric to highlight and fussy cut them. Then I added narrow borders to each scene, and surrounded them with simple 2 inch squares of “ocean-ey” fabric.


I wanted the effect to be like you were looking into an aquarium. I showed what the original wall hanging looked like in my last post.


Here’s what the Coral Reef quilt top looks like now:


I added another row of checkerboard squares to the top and bottom, and expanded the navy blue sashing to contain them. Then I added an additional 3 inch border all the way around the top. I It’s not the wall-hanging size I had originally planned, but that’s how it goes. Sometimes quilts take on a life of their own. What used to be a 46 inch square top, now measures 54 X 74.

I didn’t have a piece of fabric big enough for a backing for this sea monster, so I ended up creating one by piecing what I had leftover from the front. Here’s what the back looks like:


(You didn’t really think I could go much longer without posting a picture of Toby, did you?)

I’m pretty happy to get going again on this quilt. Now it’s time to get out the big table and start basting.


post signature

Thursday, October 1, 2009

3 UFO's for the Challenge

As I mentioned in my previous post, I've joined a UFO Challenge over at Finn's blog.  The challenge is open ended so that each quilter chooses how many projects she/he wants to finish before New Year's Eve.  I've committed myself to 3 projects, but there is one ambitious lady who has given herself the task of finishing 19!  I'll be rooting for her.

Here are the 3 projects I've decided on.  The first is my "Coral Reef" quilt:


Anyone who was reading my blog last year might remember this quilt top that I gave  to my husband for Christmas.  It started out as a wallhanging, but it had gotten so large in the process of designing it, that it was practially lap quilt size.  I waited until my husband opened it on Christmas morning to ask him if he would prefer a lap quilt, and he said that would be nice. (To his credit, he said a wallhanging would be nice too.)

I think it's time to get this top turned into a real quilt don't you?  Hopefully in time for THIS Christmas.


My second project will be to finish this quilt:


This is a twin size quilt that I am making for my daughter's boyfriend, who is a martial arts instructor.  He's currently in China right now, studying and training.  I'd like to have this one done to give him for Christmas when he returns.
 
The pattern is called "Ring Around". Right now it is pieced into four subsections which I plan to quilt separately, and then sew together afterwards, sort of a very large "quilt-as-you-go" project.


I'm waffling a bit on which project to choose as my third one, but I've settled on this one:


This green and purple Card Trick quilt top is intended to be a couch quilt for our family room.  I finished the top a long while ago, and later, in a burst of guilt-driven motivation to get it quilted I got it pin basted and ready to machine quilt, and that is how it has been for almost a year now.  (I know!)

I need to get this one actually quilted before the basting pins rust, or the couch wears out and it won't match anymore. 


So, thank you Finn, for hosting this UFO Challenge, and Good Luck to everyone else who is participating.  I hope to get all 3 of these tops quilted, and out there being used and loved, instead of sitting on top of the fabric stash.


post signature